
How to Create Facebook Business Page?
You have a business and a website and now you decided to create Facebook business page? Wondering how to go about it?
As we know Facebook continues to evolve, making it a moving target for businessmen / entrepreneur trying to find the right steps to set up a page. But not to worry—we have outlined all the necessary steps needed to start your Facebook business page.
To create your company Facebook Page, just follow these steps:
1: Open a Facebook account or Log into your existing Facebook
If you don’t have a personal profile set up on Facebook, then first go to www.facebook.com to set up your profile. Even if you do not want a personal profile, you may setting up Facebook Business Manager
Business Manager lets you: Manage access to Pages and ad accounts: Clearly see who has access to your Pages and ad accounts and remove or change their permissions. Keep your work separate: Get access to Pages and ad accounts without being friends with your coworkers on Facebook – facebook business.
Once you have successfully created account (be it personal or business) and now logged into your personal account, you can go ahead and start with your Facebook business page set up. Note; Your Business Page is linked to your personal profile, but they are completely different and nobody can see your personal information or even the name of the administrator from your Page.
2: Create Facebook Business Page while logged into your Facebook profile
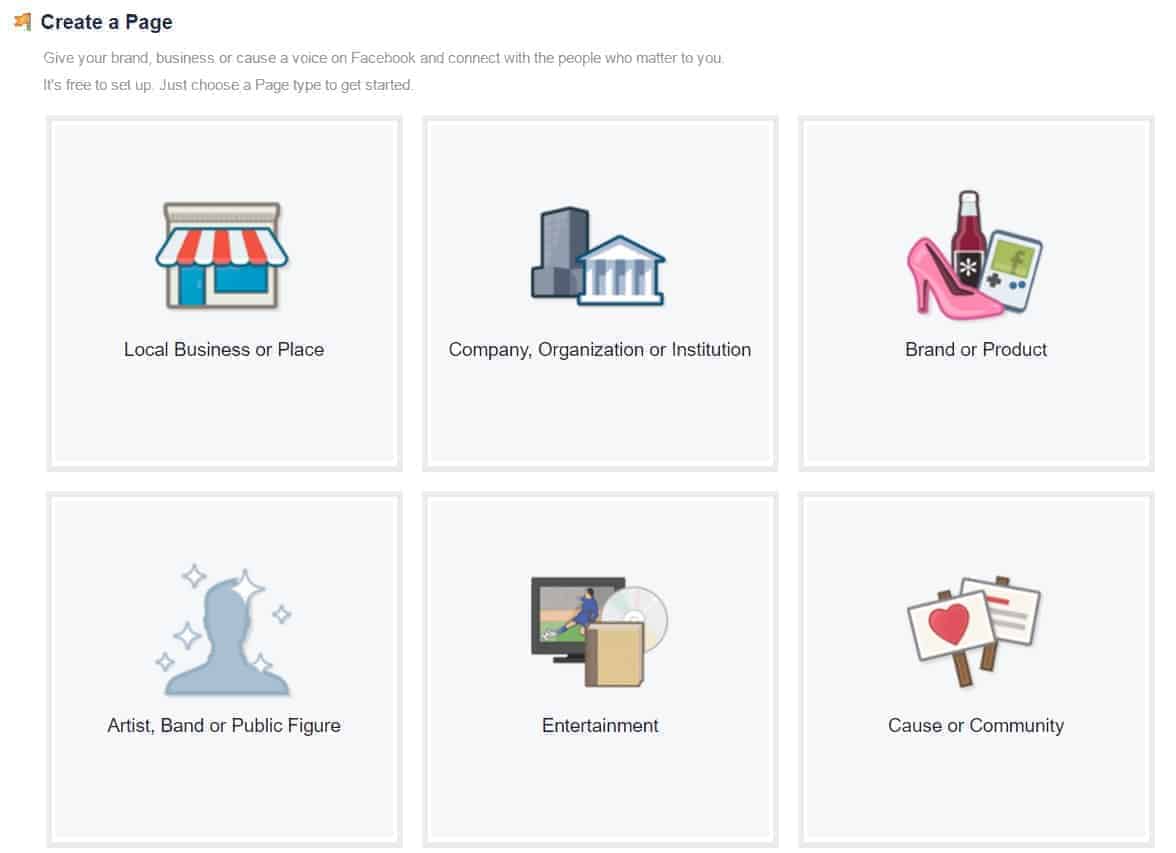
Go to www.facebook.com/pages/create.php. Take a good look at the main categories of the Pages and choose which one best describes your business. Click or select on one of the boxes to select your main category for your business and browse through the categories in the drop-down menu to see which one is more appropriate for you.
There are categories of
- Local Business or Page (for most SMEs)
- Company, Organization and Institution
- Brand or Product
- Artist, Band or Public Figure
- Entertainment
- Cause or Community
3: Choose your category from the drop-down menu and name your page
Choose your category from the drop-down menu. You can change this later if required (It is simple as Click About (Left) > General > Category > Select and Save).
The name of your page is whatever you put into the box just beneath the Category menu. It is important to carefully spend time in thinking about your page name. If you have a known brand name, then the choice is easy. But if you are just starting out, you might want to sit down and select an appropriate page name. Having keywords in your page title is a good idea because keywords help your page rank better on Facebook search. You are allowed to you maximum of 75 characters (April 2017) for your Page name. Facebook also insists on capitalizing the first word of your Page name for example, Kangxiang.
You can only change your Page name when you have about 200 fans or likes, so if you are not sure about the name at the start, you can tweak it for a while until you come up with something better. Select the box next to “I agree to Facebook pages terms and conditions” and click get started to continue. After this you are taken through some steps that will help complete your Facebook business page and add more information. The first step to create Facebook business page is to add your business profile picture.
4: Add your business profile picture
The profile picture is the image that gives your fans first impression about what your page is all about. It appears next to every post that goes into the news feed from your Page. The best size for a profile photo is 180×180 pixels, but it can be larger with different dimensions. You will be able to adjust the viewable portion of the profile picture by mousing over the photo and clicking edit profile picture and then edit thumbnail.
Select where your profile photo / business logo will be uploaded from in your laptop or smartphone.
Once you have your profile photo successfully uploaded, click Next and you are taken to the About information section to add more details about your business page.
5: Add Your Basic About Information
The About Page has several large sections to give fans more info about your wonderful business. The good thing is that the About Page is indexed in Google, so you might want to have a very descriptive about page with adequate use of the right keywords.
The basic About information that you are asked to fill is the field that will appear directly on your timeline. It is advisable to add a link to your website while completing this field, so people can easily find and access your website since this field is so important. You can also include other websites that you want to direct people to such as other social media sites by clicking on the add another site link.
Add your business information to the about field.
Select the yes button that you are representing a real business and then click save info. Congrats, you have successfully set up your Business Page! But your page ain’t ready for use yet. There are still several things you need to do to fully get your page up and running. We will take you through a series of steps on how you can get your newly created business page up and running.
1: Like Your Own Page
Facebook prompts you to like your own Page, which is a good idea and as you know the more likes you get the more visible your page is to others especially your friends on your personal Facebook profile.
2: Do Not Invite Your Email Contacts Yet
Facebook takes you to the place where you can invite your email contacts. Don’t invite contacts yet until your business page is updated a bit more. Create and customize your own email message, tuning it to your business and send it directly from your email service. Start sharing your page once the content is ready!
3: Share Something
Facebook ask you to share your first status update. You can decide to do this now or skip it. It is a good idea to have as many status updates on your timeline as possible before you start inviting people to like your Page so they can see the types of content you share on your page. Off course you should always share updates and contents that has to do with your business.
4: Add a Cover Photo
No page is complete without a good cover photo (828px x 315 px). Your cover photo should be a minimum of 399 pixels wide, but do a bigger resolution pictures to make it nicer. If you do use a standard photo, you will be able to position it to fit in the space. To change the Cover photo, hover over the bottom right corner of the Cover photo area and select the option you need.
Once you have a properly cropped cover photo that meets Facebook guidelines, click the add a cover button and then select upload photo. Choose the photo from your computer, position it on your page the way you want it to show and click save changes.
5: Add to more details to your About Page
Although you added some information about your business earlier, you should include more on your About Page, since its a means go to tell your fans the services your company offers. Click the edit page and update info menu selections from your admin panel at the top of your Page. It’s a good thing to highlight all of the good things about your company and list the websites where people can find you.

6: Review Your Permissions
Go to edit page, then manage permissions from the admin panel and review how your permissions are set up. In general, they are set up decently for a new page, but you might want to change the block list to medium and you may want to change your Message button too.
 The message button is on by default, which means that people can send your page messages which is usually a good thing but you also have to make sure you monitor messages there to enable you keep track of your messages.
At this point, your business page is ready and active. Now it’s time to get some more likes and views on your Page!
There are so many more things you can do to your Page such as add Applications, get more news feed or do some Facebook advertising. But for now, your Facebook business page is live.


No Comments